GlitchInTheMatrix
ICC Board Member
Hello guys, this is my second tutorial. This is a signature tutorial on DALE STEYN. It's very easy if you have slight experience with PS.
This is what we'll end up after finishing the tutorial:

So, let's get started!
__________________________________________________
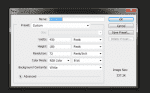
*Start up a new document with the following settings-

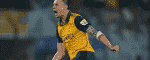
*I've used the following stock for my tutorial. Beginners should use it.
Dale Steyn goes berserk after a sensational victory | Photo | World T20 | ESPN Cricinfo
*Place your stock, always hold SHIFT key while resizing- that'll avoid any unwanted distortion to your stock. My stock placement:

Now, we are starting to roll.....
__________________________________________________
PART 1: STOCK MANIPULATION
*Copy your stock layer TWICE (Ctrl +J). Here's the stock blending-
-Bottom Stock Layer: Leave it alone, don't do any edit with it.
-Middle Stock Layer: Blending mode- "Soft Light", Opacity: 100%, Fill: 57 %.
-Topmost Stock Layer: Desaturate it (Ctrl+Shift+U), set the Blending mode to "Hard Light", Opacity: 100%, Fill: 79%
Our outcome till now-

PART 2: TEXTURE USAGE
*Place TEXTURE 1, desaturate it. And erase a bit over the body with a 30 pixel soft brush. Change the Blending mode to "Overlay" with 100% opacity and 55% Fill. Showing the way how i pasted the texture. (Don't leave it like this, i just showed you how i pasted it, change the blending mode of the texture as stated couple of lines ago.)

*Now place TEXTURE 2, change the blending mode to "Soft Light" with 100% opacity and 99% fill. Select a soft eraser and erase over his tummy and hand.
*This is the most important step of making any graphics. It's lighting. To give it a perfect lighting, you can use many variation of colors. This time I used Gold and White (In different layers). Select a Soft Brush which is 135-200 px. And, keep the FOREGROUND color as "White" or, color code- fcfafa. Now give a lighting with the settings stated above. Again, create a new layer, now brush again with the same sized brush. But, with Golden Color or, color code -fef1b5. And, change the blending mode to "Screen"
If you have done the way I stated, Our outcome till now-

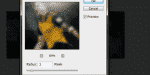
*Now, in a new layer. Apply The Image. Then go to Filter>Blur>Gaussian Blur and apply this settings

Then, Change the Blending mode to Hard Light. Opacity: 100, Fill : 76.
*Then place Texture 3. Change the Blending mode to Overlay. Erase everything of Texture 3 whichever is covering Steyn's body.
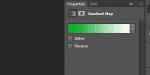
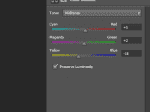
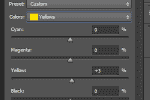
*Now to add Gradient Map to give it some perfect coloring. I've selected my Foreground color as "Green" and Background color as "White" to apply a gradient like this.
 Change the blending mode of the Gradient map to "Soft Light" and 57% fill.
Our outcome till now

*Place texture 4, Change the Blending mode to Soft Light. And, select a 50 px soft brush and erase over the body only.
Our outcome till now

*Select a Good smudge brush. Then, smudge only the edges of Steyn with a 40 px smudge brush. If you don't have any Smudge brush, then download them from deviantart.
Our outcome till now

*Place texture 5 over the body. Change the blending mode to Screen.
*Place Texture 6 on the bottom part of Steyn. Change the blending mode to Screen.
*Now, lighting time again! Select the Gold color again, select a 20 px soft brush. Brush on Steyn's two shoulders twice. Change the Blending mode to Overlay.
Our outcome till now

*Place Texture 7 on Steyn's shoulder and change the blending mode to "Linear Dodge" and Fill 56%, Opacity : 100%
*Place Texture 8 on Steyn's Bottom part and change the blending mode to Screen.
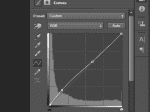
*Give the sig a Curve like this-

Our outcome till now

*Place Texture 9, desaturate it. Change the blending mode to "Soft light". Then again, erase over the body with a 30-50 px eraser.
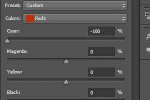
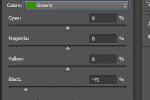
*Use color balance according to your work, as in mine

Our outcome

PART 3: FINISHING TOUCHES
*Create a new layer. Apply the Image. Go to Filter>Blur>Gaussian Blur and select the radius "45". Change the blending mode of that layer to Lighten. Fill: 50%.
*Select the Golden color again, then produce lighting with a 30 px brush. Wherever you think the lights would make it better. Change the Blending Mode to Overlay.
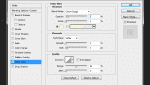
*Select Golden color, put a text on Steyn's body as "Steyn". I've used the "SundayMonday" font. Then put the text layer on "Overlay" mode. Then go to blending options and give it an outer glow like this

Our outcome till now-

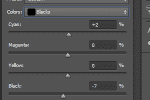
Now, it's the Final Effect time! Don't make your work look trash with these effects. Give selective colors according to your Color and Concept. Mine-


*Finally, create a new layer. Apply image. And, sharpen it. And HOORAH! You're done!
__________________________________________________
I'd love to have some comments. And, please hit THANKS if this tut helped you. And, consider posting your outcomes.
Made it because of @RPHKR @futurecricketer 's request.
I think it'd be helpful to lot of guys like @Mukesh888 @ea ragav @Rohit45 @Davoo @Salman.
Need comments from @ThebigGgamer @warlord @Sulaiman7 @Anirudh. @Anish. @Jaisuraj
Resources are attached.
This is what we'll end up after finishing the tutorial:
So, let's get started!
__________________________________________________
*Start up a new document with the following settings-
*I've used the following stock for my tutorial. Beginners should use it.
Dale Steyn goes berserk after a sensational victory | Photo | World T20 | ESPN Cricinfo
*Place your stock, always hold SHIFT key while resizing- that'll avoid any unwanted distortion to your stock. My stock placement:
Now, we are starting to roll.....
__________________________________________________
PART 1: STOCK MANIPULATION
*Copy your stock layer TWICE (Ctrl +J). Here's the stock blending-
-Bottom Stock Layer: Leave it alone, don't do any edit with it.
-Middle Stock Layer: Blending mode- "Soft Light", Opacity: 100%, Fill: 57 %.
-Topmost Stock Layer: Desaturate it (Ctrl+Shift+U), set the Blending mode to "Hard Light", Opacity: 100%, Fill: 79%
Our outcome till now-
PART 2: TEXTURE USAGE
*Place TEXTURE 1, desaturate it. And erase a bit over the body with a 30 pixel soft brush. Change the Blending mode to "Overlay" with 100% opacity and 55% Fill. Showing the way how i pasted the texture. (Don't leave it like this, i just showed you how i pasted it, change the blending mode of the texture as stated couple of lines ago.)
*Now place TEXTURE 2, change the blending mode to "Soft Light" with 100% opacity and 99% fill. Select a soft eraser and erase over his tummy and hand.
*This is the most important step of making any graphics. It's lighting. To give it a perfect lighting, you can use many variation of colors. This time I used Gold and White (In different layers). Select a Soft Brush which is 135-200 px. And, keep the FOREGROUND color as "White" or, color code- fcfafa. Now give a lighting with the settings stated above. Again, create a new layer, now brush again with the same sized brush. But, with Golden Color or, color code -fef1b5. And, change the blending mode to "Screen"
If you have done the way I stated, Our outcome till now-
*Now, in a new layer. Apply The Image. Then go to Filter>Blur>Gaussian Blur and apply this settings
Then, Change the Blending mode to Hard Light. Opacity: 100, Fill : 76.
*Then place Texture 3. Change the Blending mode to Overlay. Erase everything of Texture 3 whichever is covering Steyn's body.
*Now to add Gradient Map to give it some perfect coloring. I've selected my Foreground color as "Green" and Background color as "White" to apply a gradient like this.
Our outcome till now
*Place texture 4, Change the Blending mode to Soft Light. And, select a 50 px soft brush and erase over the body only.
Our outcome till now
*Select a Good smudge brush. Then, smudge only the edges of Steyn with a 40 px smudge brush. If you don't have any Smudge brush, then download them from deviantart.
Our outcome till now
*Place texture 5 over the body. Change the blending mode to Screen.
*Place Texture 6 on the bottom part of Steyn. Change the blending mode to Screen.
*Now, lighting time again! Select the Gold color again, select a 20 px soft brush. Brush on Steyn's two shoulders twice. Change the Blending mode to Overlay.
Our outcome till now
*Place Texture 7 on Steyn's shoulder and change the blending mode to "Linear Dodge" and Fill 56%, Opacity : 100%
*Place Texture 8 on Steyn's Bottom part and change the blending mode to Screen.
*Give the sig a Curve like this-
Our outcome till now
*Place Texture 9, desaturate it. Change the blending mode to "Soft light". Then again, erase over the body with a 30-50 px eraser.
*Use color balance according to your work, as in mine
Our outcome
PART 3: FINISHING TOUCHES
*Create a new layer. Apply the Image. Go to Filter>Blur>Gaussian Blur and select the radius "45". Change the blending mode of that layer to Lighten. Fill: 50%.
*Select the Golden color again, then produce lighting with a 30 px brush. Wherever you think the lights would make it better. Change the Blending Mode to Overlay.
*Select Golden color, put a text on Steyn's body as "Steyn". I've used the "SundayMonday" font. Then put the text layer on "Overlay" mode. Then go to blending options and give it an outer glow like this
Our outcome till now-
Now, it's the Final Effect time! Don't make your work look trash with these effects. Give selective colors according to your Color and Concept. Mine-
*Finally, create a new layer. Apply image. And, sharpen it. And HOORAH! You're done!
__________________________________________________
I'd love to have some comments. And, please hit THANKS if this tut helped you. And, consider posting your outcomes.
Made it because of @RPHKR @futurecricketer 's request.
I think it'd be helpful to lot of guys like @Mukesh888 @ea ragav @Rohit45 @Davoo @Salman.
Need comments from @ThebigGgamer @warlord @Sulaiman7 @Anirudh. @Anish. @Jaisuraj
Resources are attached.
Attachments
-
 tutpic1.png7.6 KB · Views: 276
 -
 tutpic2.png22.7 KB · Views: 278
 -
 tutpic3.png19.5 KB · Views: 279
 -
 tutpic4.png23.8 KB · Views: 275
 -
 tutpic5.png20.3 KB · Views: 263
 -
 tutpic6.png10.8 KB · Views: 255
 -
 tutpic7.png2.9 KB · Views: 252
 -
 tutpic8.png13.4 KB · Views: 249
 -
 tutpic9.png13.8 KB · Views: 248
 -
 tutpic10.png15.3 KB · Views: 254
 -
 tutpic11.png16.6 KB · Views: 284
 -
 tutpic12.png5.5 KB · Views: 242
 -
 tutpic13.png16.8 KB · Views: 246
 -
 tutpic14.png3.6 KB · Views: 244
 -
 tutpic15.png15.8 KB · Views: 255
 -
 tutpic16.png13.2 KB · Views: 249
 -
 tutpic17.png17.6 KB · Views: 249
 -
 tutpic18.png2.5 KB · Views: 237
 -
 tutpic19.png2.9 KB · Views: 241
 -
 tutpic20.png2.4 KB · Views: 242
 -
 tutpic21.png3 KB · Views: 243
 -
SteynTUTresources.rar5.8 MB · Views: 57
Last edited:
 Steps by steps make this easier for those who are new, so yet again brilliant thing you done there. KUDOS.
")


")