Hello. This is my first tutorial. It's especially aimed at newbies. Remember that you need not follow the tutorial word by word, use it as guide instead. I have added the outcome of most steps below the step itself.
Concepts used:
1. Basic stock enhancements
2. Adding a photo filter
3. Using curves to balance lighting
4. Using selective colors on artoworks
How will you learn more?
1. Play with the opacity and try to use different blending modes and see their effects
2. Try using vibrance, exposure, gamma, which I haven't used in this tutorial to make it simpler.
3. Using colored lighting instead of the BW lighting used.
First we'll select the stock. For my particular tutorial I am taking a white colored stock, If you are using any other stocks you may need to tweak the tutorial a bit.
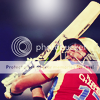
This is my stock
http://www1.pictures.zimbio.com/gi/Gareth+Bale+Tottenham+Hotspur+v+Sunderland+LmKnBtiJ_Y8x.jpg
And the outcome
Step one: Resize the stock into a 100*100 canvas.
Step two: Duplicate the layer twice
Topmost layer: Desaturate, then set at soft light (choose the fill as per your stock, for mine it's 68%)
Middle layer: Set it at screen (choose the fill as per your stock, for mine it's 39%)

Step three: Make a new layer. Fill it with any color that matches the stock you picked (blue for white - maroon for red an so on). Set it at soft light at any percent fill/opacity you like (41% for my case)
Step four: Make a new layer, fill t with white, set it to soft light at around 20% fill

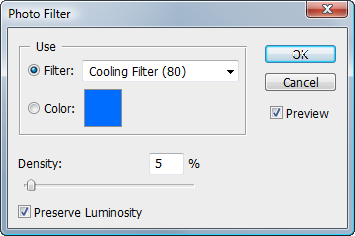
Step five: Add a photo filter. Adjust opacity and the color of the filter to your choice.
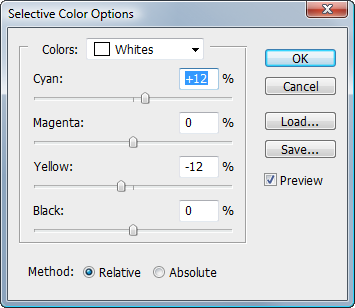
Step five: Now add selective color. This solely depends of color of stock, so if you're editing a red kit, use the reds column instead of white.

Step six: Now take a soft brush, and add lighting to any corner. If you overdo or underdo this step, you spoil the artwork.
Step seven: Fill a new layer with dark grey color, now with a very soft eraser of around 125 pixels, position it exactly in the middle of the icon to erase the dark color from the focal (main render), set the layer to soft light and adjust fill as you like (mine is 57%) This layer will five you excellent contrast.

Optional step: In new layer, Add a soft brush of any color matching with a render and just click on top of the render, set the layer mode to screen, for some good lighting effect. (I've added a blue one, set it at screen at 55% fill)

Step eight: Add the below texture at color dodge at around 15% fill


Last step: Time to add curves. If your artwork is a bit dark, then pull the curve upward, if it's too light then downward. Adjust the opacity.
That's it. Hope it was easy enough. I'd love some comment and thanks. If you need help, ask me. If you want the .psd post in the thread, so that I can send it to you or attach it if there's demand. Cheers. Please post your outcomes too.
You can share this tutorial anywhere and everywhere if you want, but please give me credit if you do so. Don't plagiarize this.


")