Viral Shah
International Coach
Today I will show you how to make avatar like this.

So lets Start.
Step 1:- First of all create a new file of 100*100 Pixels.
Fill it with black color.
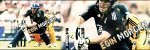
Step 2:- Than Add a stock which you like. I will be using this stock.
Step 3:- Now Resize your Stock while holding shift in Free transform Tool. So you would get this.

Now download this Brush.http://www.deviantart.com/download/83975723/Cloud_Smudge_Brushes_by_Noise_Less.abr
Step 4:-Now take out your smudge tool and take the brush you just downloaded and reduce the size of brush to 10 px. Now smudge only shoulders and you will get something like this.

Step 5:- Now duplicate it 4 times so you have 5. One original and 4 duplicate.
Step 6:- Now start from original Layer means from bottom. Color doge that layer 100%
Step 7:- Now add a selective color Layer{Image>New Adjustment Layer>Selective Color}.
Now do this settings.
After doing this step you will get something like this.

Step 8:-
Now add a layer of color balance{Image>New Adjustment Layer>Color Balance}.
You will get something like this after this step.

Now you are almost there to complete.
Step 9:- Now create a new layer and than go to Image option and in that select Apply Image.
Now after you have applied image go to Filter>Sharpen>Sharpen.
And you will get The final Result.
I hope you enjoy the tutorial and if you have any question regarding this than feel free to ask.
And would like to see your outcome.
Waiting for the comments and this is my first tutorial on avatar, so forgive me if i have done anything wrong. I am still not perfect.
So lets Start.
Step 1:- First of all create a new file of 100*100 Pixels.
Fill it with black color.
Step 2:- Than Add a stock which you like. I will be using this stock.
Step 3:- Now Resize your Stock while holding shift in Free transform Tool. So you would get this.
Now download this Brush.http://www.deviantart.com/download/83975723/Cloud_Smudge_Brushes_by_Noise_Less.abr
Step 4:-Now take out your smudge tool and take the brush you just downloaded and reduce the size of brush to 10 px. Now smudge only shoulders and you will get something like this.
Step 5:- Now duplicate it 4 times so you have 5. One original and 4 duplicate.
Step 6:- Now start from original Layer means from bottom. Color doge that layer 100%
Copy 1:- Lighten 100%
Copy 2:-Desaturate it{ctrl+shift+u} and set it to overlay 100%
Copy 3:-Color Doge 30%
Copy 4:-Lighten 80%. This step can be omitted if your stock is bright enough.
After doing this you will get this.

Copy 2:-Desaturate it{ctrl+shift+u} and set it to overlay 100%
Copy 3:-Color Doge 30%
Copy 4:-Lighten 80%. This step can be omitted if your stock is bright enough.
After doing this you will get this.
Step 7:- Now add a selective color Layer{Image>New Adjustment Layer>Selective Color}.
Now do this settings.
Reds:-
-100
-37
70
18{if it is still dark, otherwise it might be 0}
If your shirt is red than this will go wrong!
Now from the same where red is written in that select yellow
Yellow:-
-59
-33
31
-83{If not too much yellow inside the player}
Now from the same where you select yellow select cyan
Cyan:-
4
3
-61
-50
If your shirt is (light) blue than this will go wrong!
Now from the same where you select cyan select white
White:-
-83
0
51
0
Now from the same where you select white select neutral
Neutral:-
0
1
0
-17{If your stock is too dark}
After doing this step you will get something like this.
Step 8:-
Now add a layer of color balance{Image>New Adjustment Layer>Color Balance}.
In that first select Shadow
Shadow:-
-10
5
-1
Now from where you select shadow from there select Midtones
Midtones:-
-17
0
2
Now from where you select Midtones select Highlights
Highlights:-
17
0
-23
Shadow:-
-10
5
-1
Now from where you select shadow from there select Midtones
Midtones:-
-17
0
2
Now from where you select Midtones select Highlights
Highlights:-
17
0
-23
You will get something like this after this step.
Now you are almost there to complete.
Step 9:- Now create a new layer and than go to Image option and in that select Apply Image.
Now after you have applied image go to Filter>Sharpen>Sharpen.
And you will get The final Result.
I hope you enjoy the tutorial and if you have any question regarding this than feel free to ask.
And would like to see your outcome.
Waiting for the comments and this is my first tutorial on avatar, so forgive me if i have done anything wrong. I am still not perfect.
Thank You.
Last edited:
") You have done some smudge on morgan shoulder
You have done some smudge on morgan shoulder") .
.